Accurately identifying your drill bit’s diameter is crucial for precise drilling, especially when markings fade or are absent. This guide provides simple methods to measure drill bits using common tools like calipers and rulers. Learn how to determine the exact size to ensure you select the right bit for your project, preventing errors and material damage.
Whether you’re a seasoned professional or a DIY enthusiast, knowing how to measure drill bit diameter is a valuable skill. This blog will walk you through step-by-step instructions, empowering you to confidently identify the size of any drill bit in your collection. Say goodbye to guesswork and ensure perfect drilling every time.
What are Drill Bits?
Drill bits are cutting tools used with a drill to create holes in various materials. They come in a wide array of sizes, shapes, and materials, each designed for specific applications, from drilling wood and metal to masonry and plastics.
The geometry of the drill bit, including its point, cutting edges, and flutes, is optimized to efficiently remove material and create holes of the desired size and finish. Different types of drill bits exist, such as twist bits for general-purpose use, spade bits for large holes in wood, and masonry bits for concrete and brick, ensuring there’s a specialized tool for almost any drilling task.
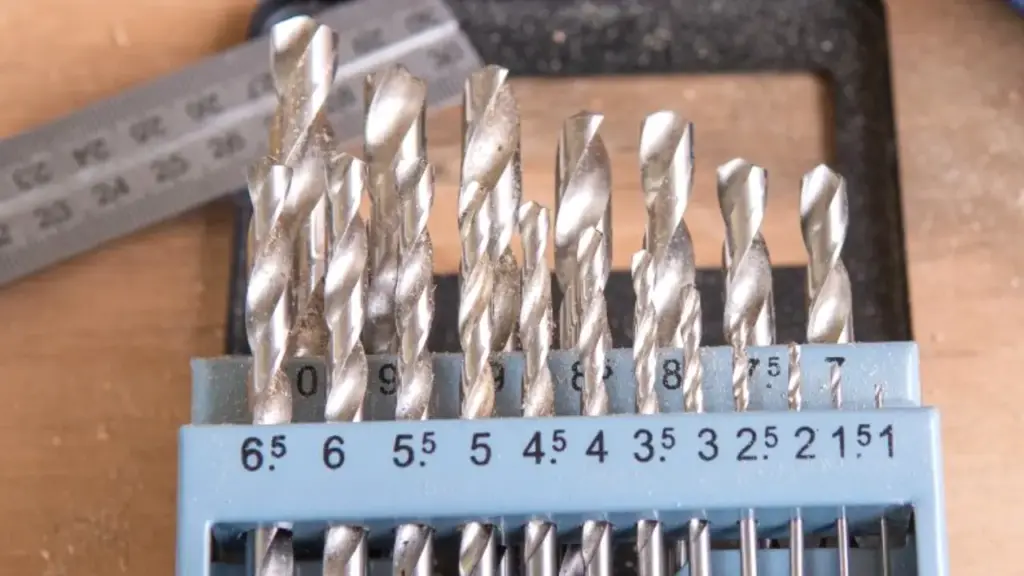
How to Measure Drill Bit Diameter?
Accurately determining the diameter of a drill bit is a fundamental skill for anyone involved in drilling, ensuring precise hole sizes for various applications, from woodworking to metalworking. When the original packaging is lost or size markings fade, knowing how to measure a drill bit becomes essential to avoid costly errors and ensure proper functionality.
Several methods can be employed, ranging from simple visual comparisons to more precise measurements using specialized tools. Let’s explore these techniques step by step to equip you with the knowledge to identify the correct drill bit diameter every time.
Step 1: Initial Visual Inspection and Comparison
Begin by carefully examining the drill bit’s shank for any etched or stamped size markings. These markings often indicate the diameter in fractional or decimal inches, or in millimeters. Ensure you check the entire length of the shank, as the marking might be small or located near the chuck end. If no markings are visible or legible, the next step involves visual comparison. A drill bit index or gauge is a useful tool for this purpose. These typically feature a series of precisely sized holes. By gently inserting the drill bit into different holes, you can find the one that provides a snug fit without any noticeable play. This method offers a quick and reasonably accurate estimation of the drill bit’s diameter.
If a drill bit index isn’t readily available, you can also compare the unlabelled bit to a set of known drill bits. By holding the unknown bit alongside bits with clearly marked sizes, you might be able to visually identify a match or a very close size. This technique requires a bit of experience and a well-organized set of reference bits. Remember to compare the cutting ends of the bits for the most accurate visual assessment. While visual comparison offers a starting point, it’s generally recommended to follow up with a more precise measurement method for critical applications.
Step 2: Precise Measurement with a Caliper
For the most accurate determination of a drill bit’s diameter, using a caliper is the recommended method. Calipers, whether Vernier or digital, provide precise measurements down to fractions of an inch or millimeter. Before measuring, ensure your caliper is clean and properly zeroed. For a Vernier caliper, the zero marks on the main scale and the Vernier scale should align when the jaws are fully closed. For a digital caliper, press the zero button with the jaws closed.
To measure the drill bit, gently open the external jaws of the caliper and carefully position them across the widest part of the cutting flutes. Ensure the jaws make firm contact with the outermost edges of the flutes without applying excessive force that could compress or distort the measurement. Take a reading from the caliper. For a Vernier caliper, read the main scale to the nearest whole unit and then use the Vernier scale to find the fractional increment. For a digital caliper, the measurement will be directly displayed on the screen. It’s good practice to rotate the drill bit slightly and take a couple of measurements to account for any minor inconsistencies in the bit’s diameter.
Step 3: Estimation Using a Ruler or Measuring Tape
In situations where a caliper or drill bit gauge is not accessible, a ruler or measuring tape can be used to estimate the drill bit’s diameter, although with a lower degree of precision. Place the drill bit on a flat surface next to the ruler or measuring tape, aligning the zero mark with one of the cutting edges at the widest point of the bit. Carefully observe the point on the ruler that aligns with the opposite cutting edge. Due to the curvature of the drill bit and the typically small dimensions involved, obtaining a highly accurate reading with this method can be challenging.
When using a ruler or measuring tape, try to position your eye directly above the measurement to minimize parallax error. It can also be helpful to use a ruler with fine graduations for better resolution. Remember that this method is best suited for rough estimations or when a precise measurement is not critical. For applications requiring tight tolerances, it’s always advisable to use a caliper or consult a drill bit gauge. Once you have an approximate measurement, you can refer to a drill bit diameter chart to find the closest standard size.
Step 4: Cross-Referencing with a Drill Bit Diameter Chart
Once you have obtained a measurement using a caliper or even an estimation from a ruler, a drill bit diameter chart is an invaluable resource for identifying the standard drill bit size. These charts provide conversions between different sizing systems, including fractional inches, decimal inches, millimeters, and number or letter sizes. By matching your measured diameter to the corresponding value on the chart, you can determine the standard drill bit size.
Drill bit diameter charts are readily available online, in machinery handbooks, and often printed on drill bit index cases. These charts are particularly useful when your measurement is in decimal inches or millimeters, and you need to find the equivalent fractional or number size for ordering or identification purposes. Keep in mind that slight variations in your measurement might correspond to different standard sizes, so always aim for the most accurate measurement possible before consulting the chart.
How to Choose the Right Drill Bit Sizes
Selecting the correct drill bit size hinges on several key factors to ensure successful and accurate drilling. By carefully considering the purpose of the hole, the material’s properties, and utilizing available resources, you can avoid common drilling errors and achieve optimal results for your projects.
Taking the time to choose the right bit will ultimately save you time, prevent material damage, and ensure the integrity of your finished work.
- Determine the purpose of the hole: Clearly define whether the hole is intended as a pilot hole to guide a screw, a clearance hole to allow a bolt to pass freely, or a precisely sized hole for a tight-fitting dowel or other component. The function of the hole dictates the required diameter relative to the fastener or fitting. For instance, a pilot hole needs to be smaller than the screw’s major diameter but larger than its core diameter to facilitate thread engagement without splitting the material.
- Consider the material hardness: The hardness and density of the material being drilled significantly influence the ideal pilot hole size for screws. Harder materials like oak or steel require pilot holes closer to the screw’s core diameter to reduce the strain on the screw during insertion and prevent breakage. Softer materials such as pine or plastic benefit from slightly smaller pilot holes to ensure the screw threads have ample material to grip effectively, providing a strong and secure hold.
- Refer to fastener size charts: Consult reliable fastener size charts provided by screw or hardware manufacturers. These charts offer specific recommendations for pilot hole diameters based on the screw gauge or diameter and the type of material being drilled. Utilizing these charts eliminates guesswork and provides a proven starting point for selecting the appropriate drill bit size, leading to more consistent and successful fastening outcomes across various projects.
- Test drill on scrap material: Before committing to drilling on your final workpiece, always perform a test drill on a piece of scrap material of the same type and thickness. This allows you to verify that the chosen drill bit size produces the desired result. You can then insert the screw or bolt to check for the correct fit – it should be snug but not require excessive force. Adjust the drill bit size as needed based on the test to ensure a perfect outcome on your actual project.
- Match the bit to the fitting: When drilling holes for dowels, pins, or other press-fit components, the drill bit diameter should precisely match the diameter of the item being inserted. A slightly undersized hole will make insertion difficult or impossible, while an oversized hole will result in a loose and ineffective fit. Accurate measurement of the fitting and selection of a drill bit with the exact same diameter are crucial for achieving a strong and functional joint.
Conclusion
Accurately measuring drill bit diameter is crucial for project precision. Simple tools like calipers offer the most reliable readings, while visual comparison and rulers can provide estimations. Understanding these methods ensures you select the correct bit, preventing errors and material damage.
Mastering drill bit measurement empowers you to work confidently across various applications. Whether you’re a professional or a DIY enthusiast, knowing the precise size is fundamental for quality results. Don’t let unmarked bits hinder your progress.
For a wide range of high-quality wholesale drilling tools, including precisely sized drill bits for all your needs, explore the selection offered by Sinodrills. Ensure accuracy and efficiency in every drilling task with the right equipment.